|
Q: Should I use a black streak remover product or something similar to remove water streaks on my boat or just stick to boat soap?
A: The answer to this question will lead you in circles until your head spins. Yes, you can use black streak remover products to remove water streaks, but over time, they will strip the wax in those specific areas and then the water streaks will become more noticeable and difficult to remove. But if you wax your boat every year, then by the time those water streaks have become stubborn to get off because the product you’ve been using has completely stripped the wax in those areas, it will be time to wax your boat anyway. Or I could have answered this question advising you to stick to boat soap, which will remove the water streaks for as long as you have a good coat of wax on your boat. Once boat soap stops removing the streaks, then you know it’s time to wax your boat again. In other words, a black streak remover product is a great band-aid and will hide the symptoms, but in the end, it too will stop working and that’s when it’s time to wax your boat again. My advice is a happy medium solution to this. Go ahead and use the black streak remover so your job is easier in removing those black streaks. But as soon as they become a bit harder to remove with the product, then take some cleaner wax and reapply it where the black streaks occur. This is something you can do by hand with a rag to apply it with and a rag to buff or wipe it off with. This will help your big yearly wax job last a bit longer. Another option is to use a boat soap with wax in it. This doesn’t mean that as you wash your boat, you’ll be waxing it at the same time. This means that this type of boat soap doesn’t strip wax and adds a light UV protectant that should last between washes to help protect your boat that much more from harmful UV rays.
0 Comments
Q: When I bring my boat back from being in salt water, is hosing it off good enough?
A: No. If you have just arrived at the marina and only have a few minutes before you have to rush off to your dinner reservations, then go ahead and hose it off as much as you can, spending any extra few minutes you have on windows – both glass and plastic. But you are not off the hook. Go enjoy your dinner, but know that you still have work to do. If it truly is evening and the sun has gone down or it’s a cloudy day, then you’ve just bought yourself some time. But if your boat is sitting in full sun, your boat needs a lot more work than just a quick hose down. This is one of those instances where putting off what needs to be done can create permanent maintenance issues in the future. Now that I’ve scared you into action, you really do need to give your boat a full wash after each salt water adventure. As soon as the sun hits your salty boat, it can burn those salty water spots into your gel coat and especially your glass and plastic windows. It can also start to rust your stainless, so time really is of the essence. Glass windows can show permanent water spots if they don’t get cleaned thoroughly and properly and once the water spot has been burned into a window, it is very difficult to remove. You can’t clean it away with a window cleaner and you can’t even pick it off with your fingernail. Unlike other water spots, you can actually see the edges of each spot created by salt. So, to keep your head from spinning, wash your boat with boat soap or Salt Away and water. Hit all sections – gel coat, non-skid, glass and plastic windows and stainless. When you’re done, wipe down all windows until they’re dry. You can do the same with stainless if you have time, but the windows require your attention more than anything else. Q: How often should my boat get washed?
A: As the owner of a boat detailing company, I would like to say that you should have us wash it every three days! That may help me pay for my next trip to Europe, but it doesn’t help answer this reader’s question and it’s completely unrealistic. The truth is that it’s different for every boat and it depends on several factors – where it’s moored (covered or open slip), how often it’s used, where it’s used (salt or lake water) and when it was last waxed. If those are the factors, then X = a boat that doesn’t require strong cleaners or soaps to get clean. X does not equal “a clean boat” because you can get a clean boat by washing it with acetone or bleach (not that anyone ever would – just making a point), but you don’t ever want your boat to get so dirty that it can’t easily be cleaned with mild cleaners. That’s why X = “a boat that doesn’t require strong cleaners or soaps to get clean”. I make this point because a lot of marinas these days are changing their policies and not allowing certain types of cleaning products or boat soaps to be used at their marina anymore. As boat detailers, we run into this all the time and have had to change the products we use to comply with these new rules. So if this is the way things are heading, then best to make the change now by making sure your boat never gets so dirty that it needs cleaners your marina won’t approve to remove stains or mildew. I’ll get off my phosphate-free soap box now and finally answer the question. You’d think that if your boat is in a covered slip, you don’t need to wash it as often because it’s not getting rained on. With a covered slip, you’re basically swapping water streaks for spider droppings and you definitely want to wash those off your boat quickly as they can stain permanently if left on the gel coat long enough and especially if your boat hasn’t been waxed in a while. If you have spider droppings and don’t have time to wash your boat, at least go around with cleaner wax and wipe them off. If your boat is in a covered slip and you’re quick to remove spider droppings, you can get away with washing your boat every eight weeks or so before it becomes a bigger job than just a basic wash. If your boat lives outside (not in a covered slip), you can get away with washing it every three to four weeks as long as it has a good coat of wax on it so the water streaks and bird droppings don’t start to set in. However, each time you take your boat out in salt water, wash it as soon as you get back to the dock to remove all salt spray. A quick hose down isn’t good enough because that salt spray can be quite sticky and it will eventually etch your windows with water spots that never come off. If you only have time for a quick hose down after a salty trip, at least spend a few extra minutes washing the windows and wiping them dry. This will pay off greatly in the future. Q: Is it OK to use a pressure washer on my boat?
A: We get asked this question a lot. You come down to your boat in early spring and are amazed at how dirty it is with green mildew actually growing on the gel coat and canvas and black mold in the non-skid. It would be tempting to use a pressure washer, but even set at a lower pressure, we highly advise against it for many reasons. First of all, you’ll be removing any wax that was left on the gel coat. Even if you’re planning to wax your boat soon after, using a pressure washer won’t improve the gel coat’s condition for waxing. You’ll still need to use a buffer with rubbing compound, so it’s not saving you much time. Especially when there are many things that can go wrong when using a pressure washer on a boat. Even the lightest of pressure can put a hole in older canvas. Medium pressure can remove fittings and ruin teak. On a colored hull or topside, a pressure washer can make areas look uneven or splotchy because of the spray pattern. On a painted boat, the pressure can easily remove paint. In the end, a boat “washed” with a pressure wash will still require you to clean certain areas by hand and the boat will need to be waxed immediately after in order to keep the gel coat from oxidizing further. We see a lot of boat detailing companies out there attach a dirty boat or teak decks with a pressure washer and we cringe every time we see this. Fittings go flying off into the water, paint starts to peel and teak decks end up with wide open grain and ugly spray patterns. It’s always best to spend some extra time washing your boat with a good ole’ bucket of soap, a soft deck brush and a soft hand brush. It’s the best way to remove the dirt and know that you’ve touched every inch without ruining your boat along the way. 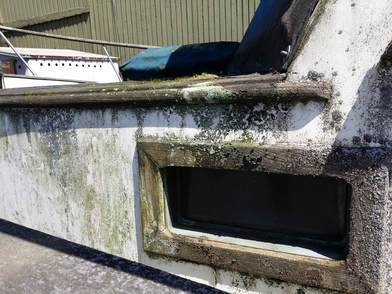 As a boat detailer here in the greater Seattle area, we see boats in all conditions from shiny and new to dirty and listing. It takes a lot for us to actually stop in front of a boat as we’re walking down the dock to cause our mouths to drop open, our heads to shake and our camera phones to come whipping out of our pockets so we can document just how bad a boat can get. And by “bad”, I don’t just mean some dirt and mildew. That’s nothing to us.
I mean a boat that has a layer of green mildew covering its once white gel coat, black mold specks in the non-skid, fuzzy moss growing out of the window sills, lichen infiltrating the canvas, green slime oozing out of the rub rail, chalky oxidation and wax-like orange bacteria growing on the walls inside the boat. This is what will stop us in our tracks and cause us to shake our heads and wonder what happened to this poor boat? We were lucky enough to come across a boat like this just before the September boat show a few years ago. As we walked out on a dock heading to the boat we were working on, a cute little 32’ Tug literally jumped out at us with its chalky blue hull and mildew covered decks crying out for help. Or at least some wax and a pat on the stern. We couldn’t ignore this boat, as it had clearly been ignored by its owner for a long time (12 years we came to find out), so we decided to give it some love and make it our “before and after” boat for the boat show. We wanted to show people that no matter how long you’ve let your boat go, you can still bring back its cosmetic luster and help protect its gel coat and wood. (You can see the before and after pictures of this boat on our web site.) If you haven’t cleaned or detailed your boat in a while, the first thing you might notice is that it’s not as shiny as it used to be. That’s because the gel coat has started to oxidize and there isn’t any wax protecting the gel coat from UV rays that come through on both sunny and cloudy days. You may also notice black specks in the non-skid that don’t come off when you wash the boat. Those are specks of black mold and we see that a lot during the winter and early spring seasons here in the Pacific Northwest. Our mild temperatures mixed with rain cause mold to grow at a very fast pace. Green mildew also grows quickly and loves to attack the edges of the canvas and underside of the bimini cover. And of course water streaks and a good layer of dust will almost always cover your boat, which isn’t a problem if you wash your boat on a regular basis, but can become a more difficult task to remove if you don’t keep it up. The 32’ Tug we came across was a great example of just how much extra work it takes to bring a boat back to new again when it’s been neglected for a long time. No amount of boat soap was even going to make a difference at this point. It would take a lot of specialized detailing products, buffers and mildew and mold killing sprays along with a lot of hard work. And because we knew that the oxidation and mildew on this boat would only laugh at a deck brush laced with soapy water coming at it, we went straight for the big guns and powered up the buffers. Once a boat is heavily oxidized, it requires a lot more than just wax to remove oxidation and bring back a shine. You’ll need a power buffer with rubbing compound and it may require several passes to completely cut through and remove all oxidation. In our case with the Tug, it was an older boat and hadn’t been waxed in a long time, therefore causing actual deterioration of the gel coat. The gel coat was thin in some areas, so we could only use so much pressure with the buffer while using rubbing compound. We were also working with a blue hull. Any mistake and you would be able to see it clearly. It took several passes with the buffer and compound, but eventually we started to see shiny blue gel coat come back to life. After removing the oxidation, we then applied a polish to seal the gel coat and then a good coat of wax to help protect it further from oxidation. Now that the hull was taken care of, it was time to attack the topside. Before compounding and waxing the topside, we needed to remove the green mildew growing all over the white gel coat and in the non-skid. We used a mildew killing spray (that you can buy at boat supply stores or in the cleaning aisle of a grocery store) to treat the decks and clean the gel coat with. It took a few passes and we had to let it sit on the decks for a few minutes each time, but eventually the mildew and black mold came out. Once we had clean gel coat, we were able to continue buffing and waxing. There wasn’t any canvas to clean on this boat, although had there been any canvas covers, based on the condition of the rest of the boat, they probably would have been good candidates for the garbage bin. You can only let canvas go for so many years without cleaning or treating it before it becomes thin, riddled with mildew and can no longer protect what it’s covering. However, if you do have neglected canvas and want to try and bring it back, the best thing to do is remove it from the boat and clean it while it’s spread out on the dock. Use a deck brush and mildew spray to treat and remove all mildew and then wash with soap and water. Hose it out well and then hang it somewhere it can dry completely before putting back on your boat. Our next task was to treat the teak wood trim and doors. They were black with water and mold stains, as well as dirty from general wear and tear. However, having been neglected for so long, the grain was very open and we knew the wood could only take so much. In order to really bring back a golden honey color, we chose to use the two-part cleaning and brightening solution (Teka Part A and B formula). However, because of the wood’s condition, we could only use a soft brush to apply the product with and couldn’t let the chemicals sit on the teak for too long. We carefully and quickly cleaned and brightened the teak and to our surprise, it truly came back to life showing its beautiful golden color once again. After all of this work, we then washed the boat and enjoyed the sight of glossy gel coat again. Well, on half of the boat. For the boat show, we decided to leave the other half untouched to emphasize our work and to show that you can bring a boat back to glossy again. It was fun to watch boat show attendees walking down the dock looking at shiny new boats only to look further down the dock and see our little Tug. Their eyes were always drawn to the bad side first that hadn’t been detailed because it was such a shocking sight that it was hard to turn away from. And then they saw the glossy gel coat and clean topside on the other half and just had to come down to take a closer look. It was rewarding to see their shock and awe and to share with them our techniques on how they too can bring their boat back to glossy again if it no longer has that shine. If you’re a do-it-yourself’er, the best way to keep your boat clean and prevent it from getting so dirty that it requires more work than what you can provide is to put it on a cleaning schedule and work on small sections throughout the year. Here is a sample plan that can help you get back on track with regular maintenance:
A plan such as this can help you maintain your boat’s cosmetic appearance and keep the gel coat, teak and other surfaces and materials in good condition. A few hours a week or one weekend each month may be all you need if you have the right gear and products and a list that helps you stay on track of your maintenance plan. And hiring a detailer at least once per year to do the deep cleaning or remove oxidation can help you take care of your boat in less time and with less work the rest of the year. But whatever you do, don’t let your boat be the one that stops us in our tracks and causes our mouths to fall open…and then write an article about it! |
The best way to contact us is through our estimate request form if you're a new customer or via email if you're a current customer.
[email protected]
206-354-9777
[email protected]
206-354-9777
|
Deckhand Detailing, established in 1990, offers affordable and high quality boat cleaning and detailing services including boat washing, boat buffing and waxing, interior and exterior cleaning and more. We're experienced, friendly and easy to work with because we love what we do!
|
|

Copyrighted material. 2002 - 2024, Deckhand Detailing. All content on this site, which includes photos, videos, written content and our logo, is copyrighted material and may not be copied in any way or for any use without permission. The Deckhand Detailing name and logo are registered trademarks.